> ## Documentation Index
> Fetch the complete documentation index at: https://docs.subotiz.com/llms.txt
> Use this file to discover all available pages before exploring further.
# 嵌入式表单
Subotiz 支持通过嵌入式表单(embedded 模式)完成结账流程。提供低代码支付集成方案,可便捷创建可定制的支付表单,助您快速完成支付流程。
## 场景演示
本页介绍如何使用嵌入式结账模式,即通过 Subotiz 的商品、定价和支付能力,快速构建一体化结账体验。
如果您只需接入支付功能,请前往 [支付模式](/zh/integration/embedded-form-payment)。
#### 嵌入完整 Checkout 页面
 #### 嵌入部分组件元素
 ## 支付流程
1. 当客户准备完成购买时,从您的客户端(client)向您的服务端(server)发起结账请求。您的服务端应使用 Subotiz API 创建一个 Checkout Session,并在创建 Session 时以参数形式传入 order\_id(接入方订单 ID,业务唯一),以便后续关联交易单。
2. Checkout Session 会提供一个 Session ID,您的客户端可使用 SDK 唤起 Subotiz 的支付表单并展示给客户。
3. 客户会在 Subotiz 表单中输入支付信息并完成交易。
4. 交易完成后,Subotiz 会以 webhook 方式通知您的服务端,通知包含支付成功事件,该事件中包含创建 session 时传入的 order\_id,借此可关联接入方订单和 Subotiz 的交易单。
```mermaid theme={null}
sequenceDiagram
participant Customer as 顾客
participant Client as Merchant Client
participant Server as Merchant Server
participant SubotizAPI as Subotiz API
Customer->>Client: 1. 发起订单
Client->>Server: 2. 获取 session ID
Server->>SubotizAPI: 3. 创建 Checkout Session
SubotizAPI-->>Server: 4. 返回session 信息
Server-->>Client: 5. 返回 session id
Client->>Client: 6. 使用 SDK 唤起表单
Client-->>Customer: 7. 展示支付表单
Customer->>Client: 8. 填写支付信息并确认
Client->>Client: 9. 处理支付
Client-->>Customer: 10. 返回支付结果
SubotizAPI->>Server: webhook 通知支付结果
```
## 接入步骤
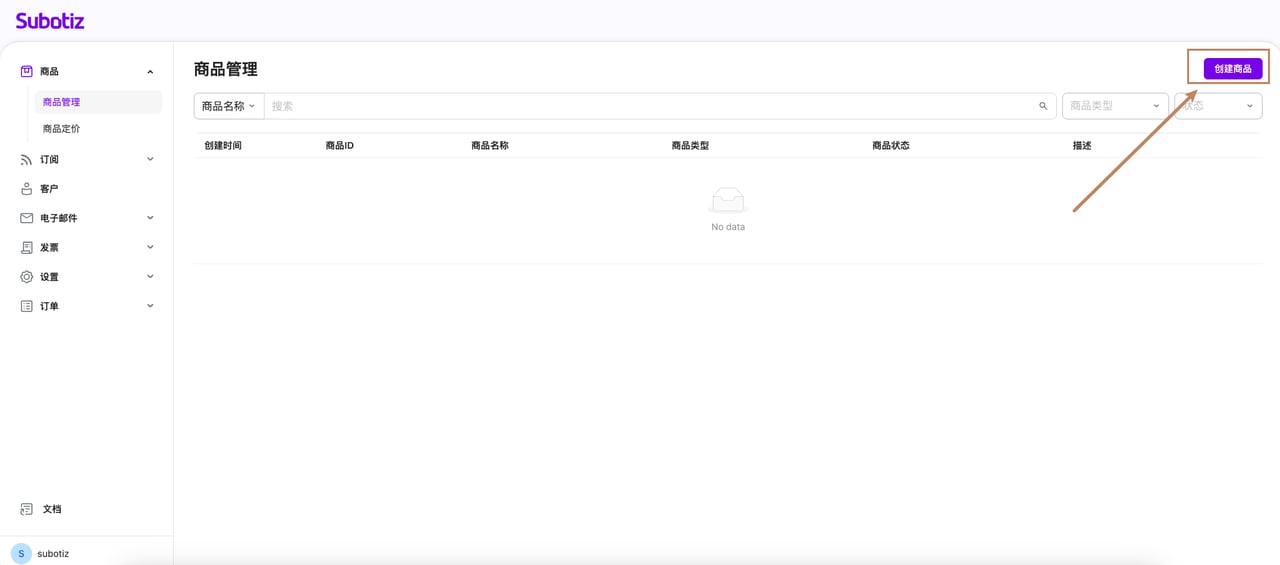
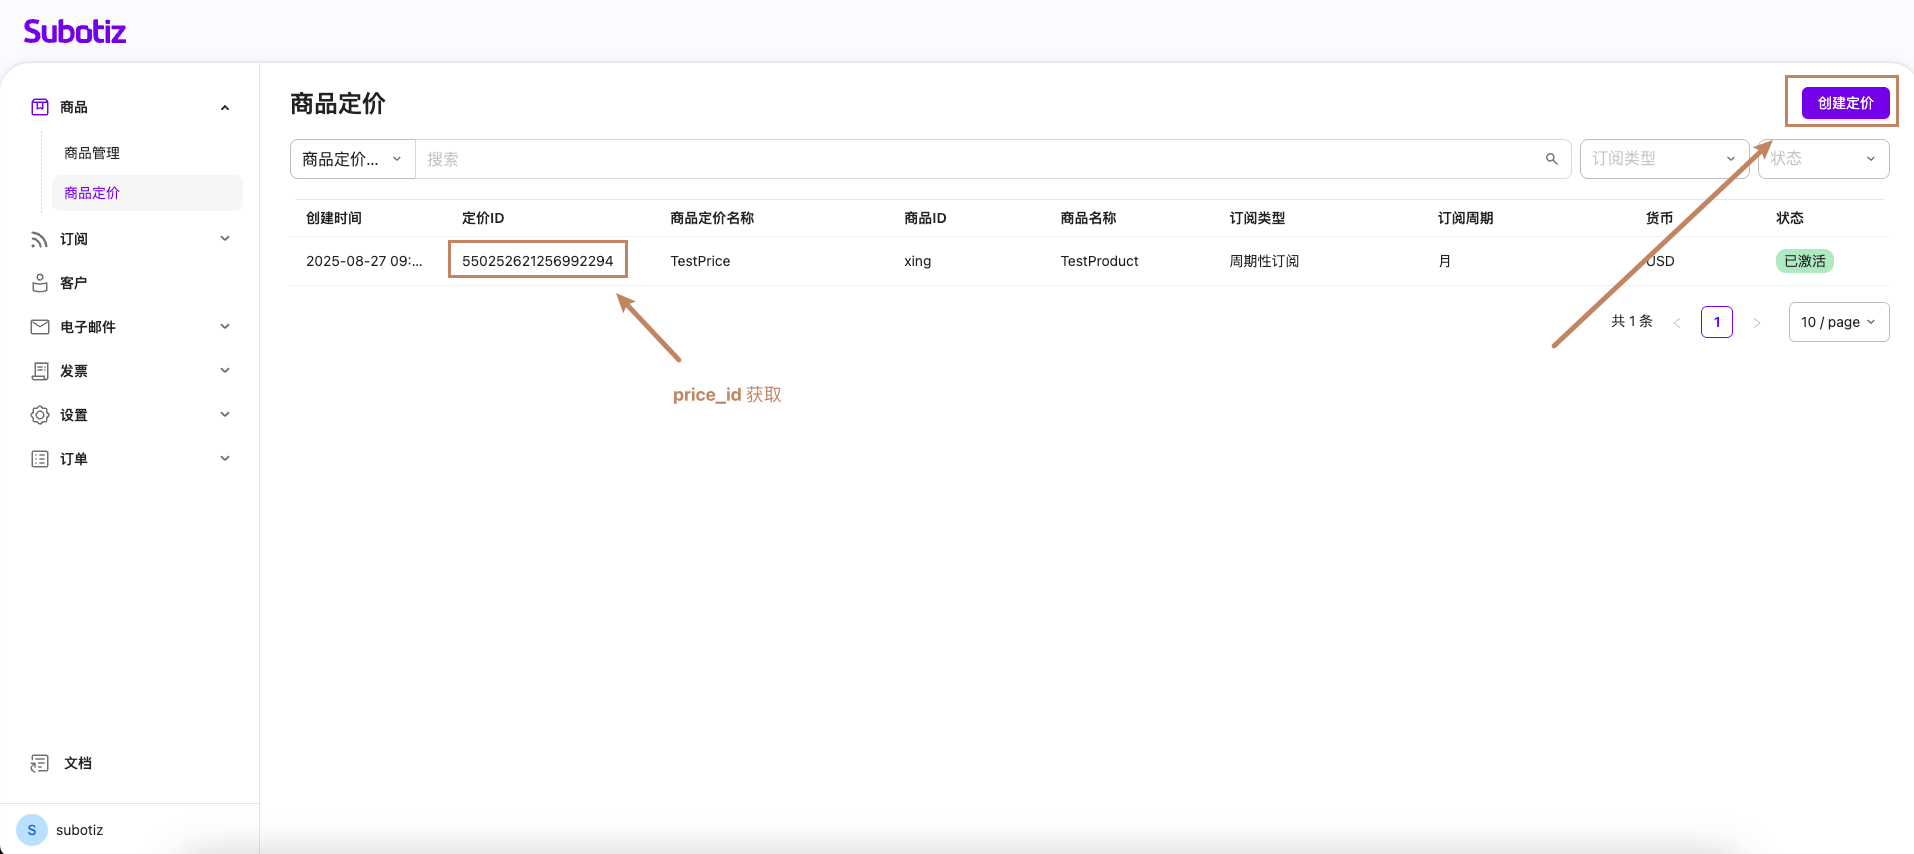
在 Subotiz 管理平台中创建商品和商品定价,将商品信息和价格信息保存在服务端中。创建 Checkout Session 时需依赖商品定价的 price\_id 来动态获取商品信息。
## 支付流程
1. 当客户准备完成购买时,从您的客户端(client)向您的服务端(server)发起结账请求。您的服务端应使用 Subotiz API 创建一个 Checkout Session,并在创建 Session 时以参数形式传入 order\_id(接入方订单 ID,业务唯一),以便后续关联交易单。
2. Checkout Session 会提供一个 Session ID,您的客户端可使用 SDK 唤起 Subotiz 的支付表单并展示给客户。
3. 客户会在 Subotiz 表单中输入支付信息并完成交易。
4. 交易完成后,Subotiz 会以 webhook 方式通知您的服务端,通知包含支付成功事件,该事件中包含创建 session 时传入的 order\_id,借此可关联接入方订单和 Subotiz 的交易单。
```mermaid theme={null}
sequenceDiagram
participant Customer as 顾客
participant Client as Merchant Client
participant Server as Merchant Server
participant SubotizAPI as Subotiz API
Customer->>Client: 1. 发起订单
Client->>Server: 2. 获取 session ID
Server->>SubotizAPI: 3. 创建 Checkout Session
SubotizAPI-->>Server: 4. 返回session 信息
Server-->>Client: 5. 返回 session id
Client->>Client: 6. 使用 SDK 唤起表单
Client-->>Customer: 7. 展示支付表单
Customer->>Client: 8. 填写支付信息并确认
Client->>Client: 9. 处理支付
Client-->>Customer: 10. 返回支付结果
SubotizAPI->>Server: webhook 通知支付结果
```
## 接入步骤
在 Subotiz 管理平台中创建商品和商品定价,将商品信息和价格信息保存在服务端中。创建 Checkout Session 时需依赖商品定价的 price\_id 来动态获取商品信息。
 您的程序需要提供顾客支付成功的展示页面,并确保能够在公网中访问。顾客付款完成后,Subotiz 会将客户重定向到该页面。
创建一个事件接收地址,以接收您账户上发生的事件。当有事件发生时,Subotiz 会发送 HTTPS POST 请求将 [Webhook](/zh/webhook/introduction-2) 事件通知到该端点,请求体内容是 JSON 格式的事件对象。您可以通过关注事件来同步变更您系统的业务数据。
您的客户端可以使用 [Subotiz SDK](/zh/resources/subotiz-sdk) 集成 Subotiz Checkout。
#### 1. 加载 Subotiz.js
```html theme={null}
```
#### 2. 提供容器节点
```html theme={null}
您的程序需要提供顾客支付成功的展示页面,并确保能够在公网中访问。顾客付款完成后,Subotiz 会将客户重定向到该页面。
创建一个事件接收地址,以接收您账户上发生的事件。当有事件发生时,Subotiz 会发送 HTTPS POST 请求将 [Webhook](/zh/webhook/introduction-2) 事件通知到该端点,请求体内容是 JSON 格式的事件对象。您可以通过关注事件来同步变更您系统的业务数据。
您的客户端可以使用 [Subotiz SDK](/zh/resources/subotiz-sdk) 集成 Subotiz Checkout。
#### 1. 加载 Subotiz.js
```html theme={null}
```
#### 2. 提供容器节点
```html theme={null}
```
#### 3. 创建 Checkout Session
使用 [Subotiz API ](/zh/api/introduction-1)创建[Checkout Session ](/zh/api/v1-checkout-session-create-checkout-session) ,并将响应结果返回前端。
**embedded 模式创建 Checkout Session 示例:**
```bash theme={null}
curl --location 'https://api.subotiz.com/api/v1/session' \
--header 'Content-Type: application/json' \
--header 'Authorization: Bearer {your_api_key}' \
--header 'Request-Id: dd7fb126-be31-4144-a1af-e4bf4203eb92' \
--data-raw '{
"access_no": "77d52a21dc032b4",
"sub_merchant_id": "2816433",
"order_id": "123e4567-e89b-12-a456-426622201a",
"payer_id": "customer_id_001",
"customer_id": "",
"email": "zhangsan@subotiz.com",
"line_items": [ # 商品信息,checkout 模式必传
{
"price_id": "543321366326164797",
"quantity": "1"
}
],
"return_url": "https://www.subotiz.com",
"cancel_url": "https://www.subotiz.com",
"mode": "checkout", # 有商品选择 checkout 模式
"integration_method": "embedded", # 选择嵌入式集成
"redirect_on_completion": "if_required" # 根据业务场景选择是否跳转,这里示例仅在必要的时候进行重定向
}'
```
#### 关键参数
* `order_id`:为接入方订单 ID,用于后续关联业务数据
* `integration_method`:设置为 `embedded`,表示使用嵌入式表单模式接入
* `return_url`: 客户在 Subotiz Checkout 页面支付成功之后跳转的页面
* `mode`:有商品数据时选择 `checkout` 模式
#### 4. 初始化结账页面
```javascript theme={null}
// After importing via the script tag, Subotiz is automatically attached to the window object
const {
Subotiz
} = window;
// Create an SDK instance
const subotiz = Subotiz();
// Initialize checkout
const checkout = await subotiz.initEmbeddedCheckout({
fetchSessionUrl: async() => {
// Fetch the sessionUrl from your server
const response = await fetch('/api/session');
const data = await response.json();
return data.sessionUrl;
},
environment: 'SANDBOX', // 'SANDBOX' | 'PRODUCTION'
// The callback function when the payment completed only triggers when `redirect_on_completion` is set to `if_required` during Checkout session creation
onComplete: () => {
console.log('Payment completed!');
}
});
// Mount to the page
checkout.mount('#checkout-container');
```